

How To Register A Vtech Handset To An Old Base
How to build a elementary smart card emulator & reader for Android
How-do-you-do! I am a Senior Software Engineer @TWG. Previously, I worked at Gemalto — the world'due south biggest Smart Cards manufacturer.
Introduction:
Smart Cards take a lot of useful functions - from ID cards, to repository cards - and they present a flexible, secure and portable tool to manage all sorts of data.
The goal of this article is to exist able to utilize the Android phone's NFC to emulate and read a Smart Card, but earlier that, it's very important to understand how Smart Cards work and communicate with readers.
What you demand:
- Bones Android development cognition
- Basic Kotlin knowledge, every bit nosotros will do the examples in Kotlin
- An Android telephone A with NFC that volition act every bit a Card Emulator for our tests
- An Android phone B with NFC that will act as a Card Reader
- Optional: an ePassport that is ICAO compliant. you lot can verify if your passport is ICAO compliant and contains an electronic flake past looking at the front and seeing this sign:
Smart Cards:
Smart Cards are, for all intents and purposes, mini-computers, that contain a micro-processors and memory. But like a regular reckoner, they can have an OS and applications running (they are called Applets) capable of doing complex operations as well equally providing a secure access to information.
Types:
Smart Cards can be "Contact", "Contactless", or both (Dual Interface). Contact cards accept to be in directly contact with the reader in order to exist powered and prepare for communication. Contactless cards however tin exist communicated with using 13.56-MHz Radio Waves from a maximum distance of 10 cm (4 in). they contain an antenna that enables this blazon of communications:
Every telephone has at least a Contact Smart Card Reader, which is used to read the SIM card. About Android phones have a Contactless Smart Card Reader in the form of the NFC Reader, which we volition give examples on how to employ.
Data Structure:
The ISO7816 regulates how the data in Smart Cards should be structured. It supports the following construction:
DF/Dedicated Files: You lot can think of them as directories containing files. It is mandatory to accept at least one root DF which is called Master File (MF).
EF/Elementary Files: These are files containing binary data that tin be read or written to past an external reader.
Cards can sometimes contain more than ane Applet, and the first affair you need to practice is select the Applet y'all want to communicate with using its Assistance.
Communication Protocol:
The ISO7816 also defines the advice protocol with Smart Cards (contact and contactless). In club to communicate with the card, a reader has to send an "APDU Command" (Awarding Protocol Data Unit of measurement Command) to the card, which will respond with an "APDU Response".
APDU commands are byte arrays containing the post-obit:

Of import: In all the following, nosotros volition refer to bytes in their Hexadecimal representations, like `A0`, `Fe`, `00` …
CLA: the Grade byte is used to indicate to what extent the command complies with the ISO7816, and if so, what kind of "Secure Messaging" will be used. To continue things elementary, nosotros will not be using this byte in our example and nosotros will be passing `00` all the time.
INS: the Instruction byte is used to indicate what method nosotros desire to execute, this can be a diversity of methods similar: `A4` to Select a File or Applet, `B0` to Read a Binary, `D0` to Write a Binary … (meet full list of Instructions here )
P1 & P2: these two Parameter bytes are used for further customization of the Education, they depend on what custom commands the card specifies. Click here for the listing of the possible cases
Lc: is the length of the information to be sent
Information: is the actual data for the Instruction
Le: is the length of the expected response
And and then an case to select a file or Applet with an `ID = A0000002471001` will be equally follow: `00 A4 0400 07 A0000002471001 00`
Once the card receives the command, it will respond with an APDU response as follow:

Data Field: is the the body of the response
SW1 & SW2: are the status bytes, they are separated because sometimes the beginning byte can tell us the actual condition, and the second byte can specify more than information nigh that status. For example, if we apply a command to "Verify a Pin" with the wrong Pin, the card will return a condition of `63 CX` where 10 is the number of attempts left, that way, the reader app can easily cheque the first byte for the condition and second for the number of attempts left.
When the command has been successfully executed, we commonly become a `90 00` status (Run into the full list of possible responses in here)
Using the information above, we are now ready to create a Smart Carte Emulator and a Smart Card Reader in Android, permit'due south get right into it:
Make certain you are running the Android Studio three.1 Canary or afterward to back up Kotlin development
Host-based Carte Emulation (HCE):
Starting from Android iv.4, nosotros take the possibility to create a Card Emulation Service, that will act as a Smart Menu by taking APDU commands and returning APDU responses. To do that, let's create a new Android project: New → New Project
Brand sure you are checking the `Include Kotlin back up` checkbox, and click "Next"
Make certain you are selecting API 19 or higher, as the Bill of fare Emulation is simply supported starting Android 4.iv. Click "Side by side", choose "Empty Activity" and "Terminate".
The simply reason nosotros are calculation an action is to make things simpler, our Card Emulator will run as a Service all the time in the groundwork, so it doesn't actually demand an activity, simply for the sake of simplicity, we will use one.
The first thing we will add is the Manifest permission annunciation to utilize NFC, in your `AndroidManifest.xml` add together the following within the `manifest` tag before the `application tag`:
<uses-permission android:name="android.permission.NFC" /> Adjacent we volition add the requirement for the HCE hardware so that the app only installs on phones that can run the HCE, right under the previous line, add this line:
          <uses-feature android:name="android.hardware.nfc.hce"
              android:required="truthful"            />
Next, nosotros will declare our HCE service inside the `application` tag:
          <service
              android:proper noun=".HostCardEmulatorService"
              android:exported="true"
              android:permission="android.permission.BIND_NFC_SERVICE">
            <intent-filter>
            <activeness android:proper name="android.nfc.cardemulation.activity.HOST_APDU_SERVICE"            />
            </intent-filter>              <meta-data
                android:name="android.nfc.cardemulation.host_apdu_service"
                android:resource="@xml/apduservice"              />
</service>
At that place is a lot going on in this proclamation, so permit's go through it:
- Name: is the name of the Class that will implement the Service callbacks (we will create that in a minute).
- Exported: this has to be truthful in order for our service to be accessible by other applications. If this is imitation, then no outside application can collaborate with the service, which is not what we want.
- Permission: the Service has to Bind to the NFC service in order to exist able to apply NFC.
- Intent Filter: When the Android organization detects that an external Carte Reader is trying to read a card, it fires a `HOST_APDU_SERVICE` activity, our service having registered to that action, volition be chosen, and then nosotros tin can do whatever we want once our service is called into activeness.
- Metadata: in order for the system to know which services to call based on which Aid the reader is trying to communicate with, we demand to declare the `meta-data` tag and point to an XML resource.
Permit'southward create the `apduservice` XML file at present: Right-click the `res` binder in your project and cull new → Directory, call it `xml`. Then create a new xml file inside this new directory called `apduservice` and write the following within:
          <host-apdu-service xmlns:android="http://schemas.android.com/apk/res/android"
              android:description="@string/servicedesc"
              android:requireDeviceUnlock="false">
            <assist-group android:description="@string/aiddescription"
              android:category="other">
            <assist-filter android:proper noun="A0000002471001"/>
            </aid-group>
</host-apdu-service>
The most important office here is the AID filter, which registers our service to be fired if that AID is being selected by a Card Reader.
Yous have to create the @string values for the descriptions
Now we will create our Service, Right-click your package, select New → Kotlin File/Course
Select `Form` and the same name we put in the Manifest. Click Ok.
Now we will extend `HostApduService` Abstruse Grade and implement its abstract methods:
                      course            HostCardEmulatorService: HostApduService() {
            override fun            onDeactivated(reason: Int) {
            TODO("not implemented")            //To change body of created
              // functions utilise File | Settings | File Templates.
            }              override fun              processCommandApdu(commandApdu: ByteArray?,
              extras: Packet?): ByteArray {
              TODO("not implemented")              //To alter body of created
                // functions use File | Settings | File Templates.
              }
}
The `onDeactiveted` method will be called when the a different Assistance has been selected or the NFC connexion has been lost.
The `processCommandApdu` method will be called every time a card reader sends an APDU command that is filtered by our manifest filter.
Allow's define a few constants to work with, before the showtime method, add together the following:
                      companion object            {
            val TAG            =            "Host Card Emulator"
              val STATUS_SUCCESS            =            "9000"
              val STATUS_FAILED            =            "6F00"
              val CLA_NOT_SUPPORTED            =            "6E00"
              val INS_NOT_SUPPORTED            =            "6D00"
              val AID            =            "A0000002471001"
              val SELECT_INS            =            "A4"
              val DEFAULT_CLA            =            "00"
              val MIN_APDU_LENGTH            = 12
}
Simply go alee and write this within the `onDeactivated`:
Log.d(TAG, "Deactivated: " + reason) Before implementing the `processCommandApdu` method, we volition need a couple of helper methods. Create a new Kotlin Class named `Utils` and re-create the two following (static in Java) methods:
                      companion object            {
            private val HEX_CHARS            =            "0123456789ABCDEF"
              fun            hexStringToByteArray(data: Cord) : ByteArray {              val              consequence = ByteArray(data.length              / 2)                          for              (i              in              0              until              data.length                            step              2) {
              val              firstIndex =              HEX_CHARS.indexOf(data[i]);
              val              secondIndex =              HEX_CHARS.indexOf(data[i + 1]);                          val              octet = firstIndex.shl(4).or(secondIndex)
              upshot.set(i.shr(ane), octet.toByte())
              }                          return              outcome
              }                          individual val HEX_CHARS_ARRAY              =              "0123456789ABCDEF".toCharArray()
              fun              toHex(byteArray: ByteArray) : String {
              val              result = StringBuffer()                          byteArray.forEach                            {
                val              octet =              it.toInt()
              val              firstIndex = (octet and 0xF0).ushr(4)
              val              secondIndex = octet and 0x0F
              result.append(HEX_CHARS_ARRAY[firstIndex])
              upshot.append(HEX_CHARS_ARRAY[secondIndex])
              }                  render                              result.toString()
              }
}
These methods are here to convert betwixt byte arrays and Hexadecimal Strings.
At present permit'southward write the following into the `processCommandApdu` method:
                      if            (commandApdu ==            null) {
            render            Utils.hexStringToByteArray(STATUS_FAILED)
}              val              hexCommandApdu = Utils.toHex(commandApdu)
              if              (hexCommandApdu.length              <              MIN_APDU_LENGTH) {
              return              Utils.hexStringToByteArray(STATUS_FAILED)
}                          if              (hexCommandApdu.substring(0, two) !=              DEFAULT_CLA) {
              return              Utils.hexStringToByteArray(CLA_NOT_SUPPORTED)
}                          if              (hexCommandApdu.substring(2, 4) !=              SELECT_INS) {
              return              Utils.hexStringToByteArray(INS_NOT_SUPPORTED)
}                          if              (hexCommandApdu.substring(10, 24) ==              Assistance)  {
              return              Utils.hexStringToByteArray(STATUS_SUCCESS)
}              else              {
              return              Utils.hexStringToByteArray(STATUS_FAILED)
}
This is obviously just a mockup to create our offset emulation. You tin can customize this every bit you like, merely what I created hither is a uncomplicated check for length and CLA and INS that returns a successful APDU (9000) but when we select the predefined Help.
Android Card Reader with NFC Case:
Just similar the previous project, create a new project with Android 4.4 every bit a minimum SDK, and with Kotlin support, with an Empty Activeness.
Inside the `AndroidManifest.xml` declare the same NFC permission:
<uses-permission android:name="android.permission.NFC" /> Also declare the NFC requirement:
          <uses-feature android:name="android.hardware.nfc"
              android:required="true"            />
In your activity_main.xml layout, just add a TextView to see the card responses with
          <TextView
              android:id="@+id/textView"
              ....
/>
Copy the `Utils` Course from the previous project because nosotros will use the aforementioned methods here equally well.
In your Activity, next to the `AppCompatActivity()` extension, add the post-obit:
grade MainActivity : AppCompatActivity(), NfcAdapter.ReaderCallback This will implement the `ReaderCallback` Interface and you will have to implement the `onTagDiscovered` method.
Inside your Activity, declare the following variable:
private var nfcAdapter: NfcAdapter? = nothing In your onCreate method, add together the following:
nfcAdapter = NfcAdapter.getDefaultAdapter(this); This will get the default NfcAdapter for united states of america to use.
Override the `onResume` method as follow:
                      public override fun            onResume() {
            super.onResume()
            nfcAdapter?.enableReaderMode(this,            this,
            NfcAdapter.FLAG_READER_NFC_A            or
            NfcAdapter.FLAG_READER_SKIP_NDEF_CHECK,
            zip)
}
This will enable reader style while this activity is running. When dealing with a Smart Carte, make certain you search the technology it is using, so you declare it, but mostly yous can use NFC_A. The second flag is there then nosotros skip the NDEF interfaces, what that means in our instance, is we don't want Android Axle to be chosen when on this activity, otherwise, it will interfere with our reader, because Android gives priority to NDEF blazon earlier TECH blazon (or Smart Cards in General)
Don't forget to override the `onPause()` method and disable the NfcAdapter:
                      public override fun            onPause() {
            super.onPause()
            nfcAdapter?.disableReaderMode(this)
}
Now the last thing left is to beginning sending APDU commands once a card is detected, so in `onTagDiscovered` method, let's write the post-obit:
                      override fun            onTagDiscovered(tag: Tag?) {
            val            isoDep = IsoDep.get(tag)
            isoDep.connect()
            val            response = isoDep.transceive(Utils.hexStringToByteArray(
            "00A4040007A0000002471001"))
            runOnUiThread            {            textView.suspend("\nCard Response: "
            + Utils.toHex(response))            }
            isoDep.close()
}
Now if you run the offset app on Telephone A, and the second app on Telephone B, and so put the phones back-to-back, so their NFCs are facing one another, here is what will happen as soon every bit Phone B detects :
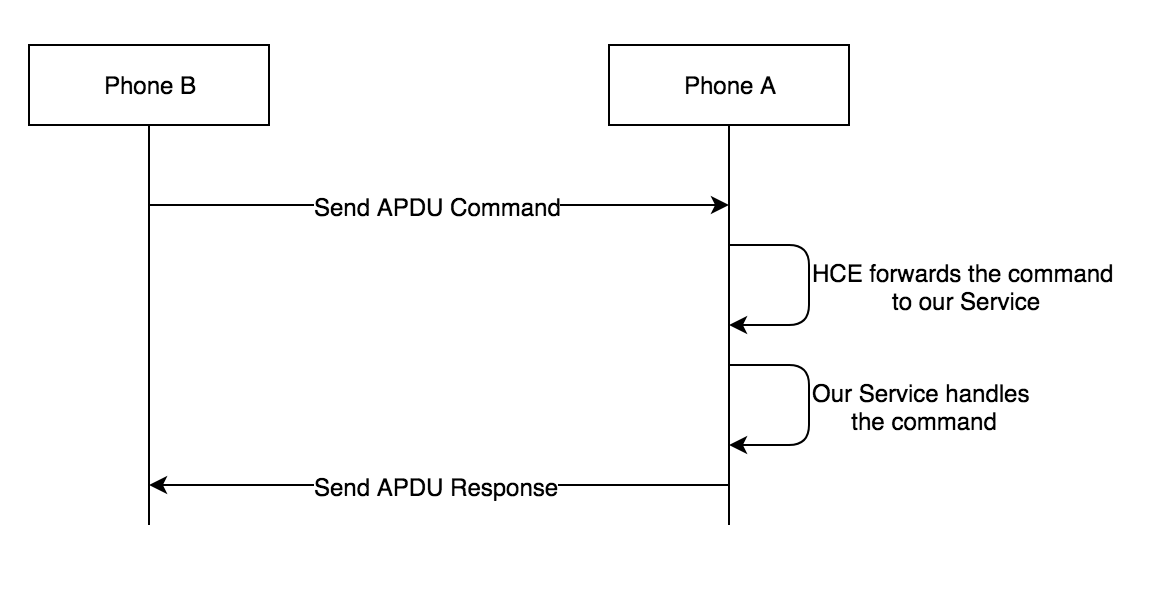
Phone B will transport the above APDU control to the HCE of Telephone A, which will forward it to our Service and return a 9000 condition. Y'all can intentionally alter the command to see one of the errors we put in the Service, like using another CLA or INS …
Now here is the adept part. If y'all take Phone B with our Bill of fare Reader App, and put your ePassport back (where the Chip is) on the NFC reader of the phone, you lot volition see the 9000 response from the Fleck of the Passport.
Wait! What just happened at that place?
The APDU command nosotros are sending to the Card is the aforementioned we saw on the beginning paragraph. Information technology is trying to Select the AID `A0000002471001`, which is the ID of the Applet that contains the personal data of the holder inside every ICAO compliant ePassport.
Where to go from here:
You can actually utilize what we went through here to read the personal data inside the passport, but that's a whole other subject field, that I volition cover in part two of this series. Basically, we would need to do Basic Access Command (BAC) where we evidence to the fleck that we know the keys (The keys are generated based on the Number of Document, Decease Date, and Birthdate). If you are interested in creating a passport reader, you lot take to read more virtually BAC and the construction of data inside a Passport, starting Folio 106 is where BAC is explained.
By knowing how to emulate a Smart Carte, you can write your own mock-up for a Card that you don't physically have, just have the specs for. Then, you tin can use the reader we created to read information technology, and it will piece of work perfectly with the real Card once you have it.
Y'all can also use your phone instead of an bodily Card - if you know what the cards contains - past writing an Emulator that acts exactly like the carte du jour. This means you don't take to conduct your Bill of fare — you lot could only utilize the Emulator app to exercise what you lot would with the Carte du jour.
Download Sources for the Host-based Carte du jour Emulator.
Download Sources for the Sample Smart Card Reader.
Written by Mohamed Hamdaoui for TWG: Software makers to the earth's innovators. Scan our career folio to larn more than about our team.

Source: https://medium.com/the-almanac/how-to-build-a-simple-smart-card-emulator-reader-for-android-7975fae4040f
Posted by: stevensonbeforming.blogspot.com
0 Response to "How To Register A Vtech Handset To An Old Base"
Post a Comment